Removing Joomla Blog IDs from URLs
Removing IDs from URLs in Joomla
Joomla 3.7 made some changes to the way we manage the inclusion of ID numbers for articles within the Blog category. When you block those digits from being rendered in your URLs or aliases, the pages will get a boost in SEO-friendliness. The biggest risk- and it’s a serious one- is the damage which can be done to your organic rank. If you don’t sort the ID issue, all your blog URLs will suddenly change- to “ID number inclusive” ones. If your original URL was something like 5-tips-for-better-seo it might suddenly become 161-5-tips-for-better-seo which looks wrong even before someone clicks it. If your URL looks bad, you won’t get as much traffic click through to your website.
This also means any instances of the former URLs- from internal or external links- will produce a 404 “Page not Found” error.
Aside from providing a poor user experience, your rankings will suffer- regardless what is written elsewhere.
We ran tests and certain pages slipped 10 positions within 48 hours of us intentionally breaking 3 links. When the links were restored and new sitemaps generated, the rankings returned 5 days later. Be vigilant when doing Joomla upgrades, and maintain a close watch over the SEO friendliness of your URLs.
When did you last backup your website- that’s all of it- database and files?
Remember- an untested backup is as good as no backup at all.
I’m going to recommend you download and install Akeeba Backup.
This plug-in has been around for a long time- and receives regular updates.
It was created by Nicholas Dionysopoulos after he lost four years’ work. Luckily the hard drives were able to be recovered after a long process- but it left Nick with the intention that nobody should have to suffer through what he experienced.
Let’s Get Started
It’s great you’ve backed up your complete website, and downloaded it to a local drive!
This information is applicable to Joomla 3.7 and will be updated here on this page, as versions change, only if a different technique is required.
Log In To Your Server
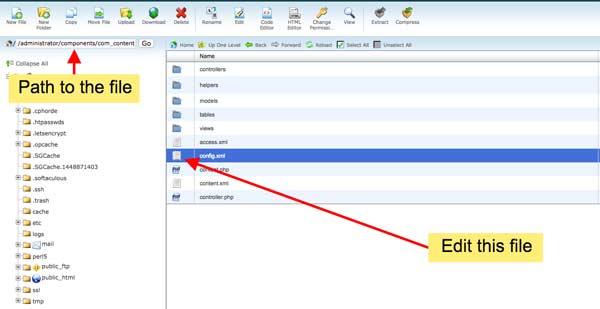
Within the public_html directory- or root directory of your site, follow the path /administrator/components/com_content and look in there for the config.xml file.
This is the file you will be editing.
Click the “Edit” icon shown at the top of the screenshot.
Make the changes we’ve described here- and remember to save the file before you close it. Adopt best practice techniques- use the “close” button which appears on the file, instead of just closing the browser’s window.
 com_content folder” itemprop=”image” width=”600″ height=”309″>
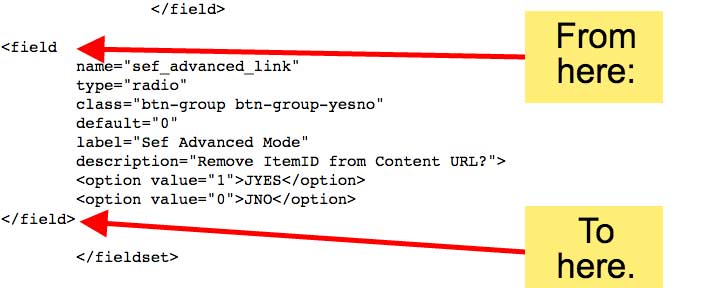
Follow the example image, and paste the following code where indicated, on the config.xml file:
  <field
 	name="sef_advanced_link"
 	type="radio"
 	class="btn-group btn-group-yesno"
 	default="0"
 	label="Sef Advanced Mode"
 	description="Remove ItemID from Content URL?">
 	<option value="1">JYES</option>
 	<option value="0">JNO</option>
 </field>
Paste the Code into the File
The following image shows what the new code will look like when it gets pasted to the file.
Note the position- you paste right after an existing ‘filed’ closing tag- and right before the closing ‘fieldset’ tag.
Remember to add the code as shown in the screenshot. One wrong move here- just one keystroke- will cause your site to throw an error. If you don’t feel confident editing such critical files, our search engine optimisation services include making adjustments to core files for better website performance.  com_content folder” itemprop=”image” width=”728″ height=”288″>
The Interface Before Adding the Custom Code
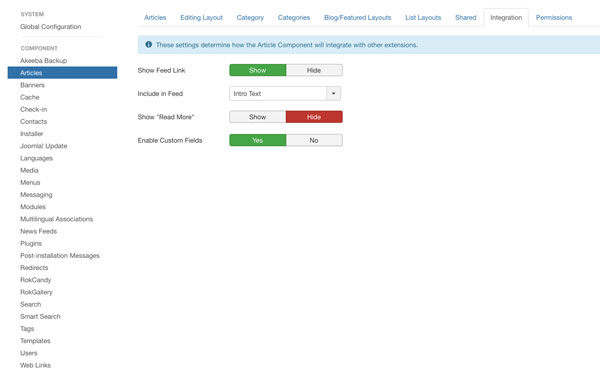
This is how the “Integration” tab of the “Global Configuration > Article” edit window renders the options before the custom code gets added. When you paste the code into the config.xml file, a custom set of buttons will be created within this Options window, to enable or disable the setting of SEF friendly URLs.  com_content folder” itemprop=”image” width=”600″ height=”369″>
After the Custom Code
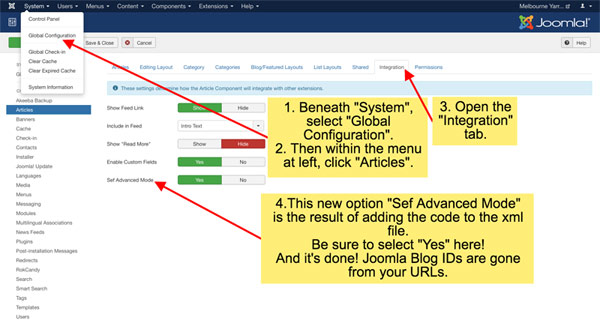
Take a look at this screenshot, which contains a summary of how to reach the window- and also provides a view of the desired outcome. The new buttons are shown. Please remember to select “Yes” – that’s the green button- to get the benefit of the work you’ve done.
Now might also be a good time to check that you’ve followed best practice techniques for writing SEO titles.  com_content folder” itemprop=”image” width=”600″ height=”335″>
If you have followed the directions, the article IDs will no longer appear in your Joomla website’s URLs. Your website will continue to experience stable rankings which come from not having broken links.

